Showing posts with label crafting. Show all posts

Tuesday, June 24, 2014

Adventures in Ice Dyeing


I've been busy lately doing a lot of sewing.  I decided to open up my Facebook blog page to more of a business page. I'm making and selling more these days so that is the best way to keep up with me.

A couple months ago I purchased some adorable fabric from So Cheeky.

such a fun print

It's so lush and soft. I knew I wanted to make myself a shirt out of it.  Since I've made myself a couple bubble shirts recently I decided to do the same with this fabric.  This style of top is perfect for the hot Memphis summers (and to cover up my inability to lose the baby weight).
I always look like I want to smack my husband in photos 


I love the feel and fit of the top.  But with a toddler and a baby I didn't think that much white would work for me.  So I turned to my newest crafting obsession, ice dyeing. If you don't know about ice dyeing it's simple and fun. I find it less messy than tie dyeing.  It also takes up a lot less space while you are doing it.


I picked out a couple greens and a blue and got started. The only hard part is letting it sit for 24 hours.
 I pleated and then rolled the fabric. I haven't tried that particular fold before so I wanted to give it a try. Since the fabric was thick after 7 hours I flipped it and then dyed the other side. I wanted to make sure it went all the way through.
I'd normally leave the colors to set a bit longer but I decided I wanted the colors to be slightly more subdued than jewel toned so I rinsed it earlier than the 24 hours and did a hot wash with Synthrapol.


 Garrett decided he wanted to show off the t-shirt I made him yesterday.


Here is a better shot of how the colors came out.
I'm in love with the way this came out. I can't stop touching it because the fabric is so soft.  Glad I have another yard to use.

For more of what I'm sewing check out my Facebook page. https://www.facebook.com/craftinghobbit

Saturday, April 13, 2013

And just so I can throw some crafting in here...

These are the cloth pads I made as a giveaway for the Great Cloth Diaper Change next weekend.

I hope whoever wins them likes them.

Friday, September 28, 2012

Wrap it up!

I decided it would be fun to make a small  wreath for our door this year. I found a small foam wreath at Target. For just a dollar you can't beat the price.
I've gotten the first part done and wrapped it with green yarn.

Monday, July 30, 2012

Make your own baker's twine

I remember going to the baker's as a child and watching them wrap the boxes in that red and white twine. Now there are so many different colors you can buy. But why buy when you can make?

I stumbled upon (literally) this great tutorial for making your own baker's twine. I already have a ton of Sharpies on hand so I went to Walmart to get a ruler (25 cents) and the crochet thread ($2.28).
If you get the thread at Michael's or Joann's using a coupon you could probably pay even less. I had masking tape but you could use almost any tape if you aren't planning to use the ruler for anything else.

I had the little cardboard winders on hand already. They are perfect for keeping the twine from getting tangled.

I can't wait to tie up Garrett's birthday gifts. It's so colorful and fun. You could even make multicolor twine.

Thursday, July 12, 2012

Tea towels turned bread bags

I don't really have a ton of cute tea towels. For me they were functional for drying dishes. Now we've started baking our own crusty bread (really simple and delicious recipe) I need bread bags.
Plastic bags don't breathe and keep moisture in. Paper bags get tossed out. But linen, linen makes perfect bread bags.

So I gathered some of my tea towels and made simple drawstring bread bags.  I've saved so much cord and ribbon that I used what I had in my stash as drawstrings.

Step 1: Seam up the sides.  I used my serger for this. You can use a regular machine and sew up the sides or do french seams.
I really love my serger

Step 2: Fold the top down to make a casing for your drawstring.  Since the top of the towel already has a finished edge you don't need to have it doubled under.

Step 3: Insert string.

Step 4: Put the bread in the bag. Try not to eat it.

You may notice there is no bread in this bag. That's because we need to make more. These bags are so easy to make and great for gift giving instead of wrapping paper.

Tuesday, July 3, 2012

Business card holder

My amazing friend Laura made me this Sculptey creation today.
I love it and I'm excited to show it off.


Tuesday, June 5, 2012

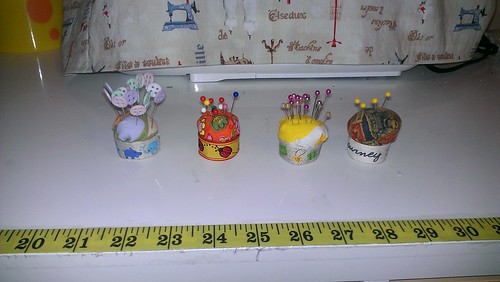
Mini Pincushions

mini pincushions by teawithfrodo
mini pincushions, a photo by teawithfrodo on Flickr.
Love making mini pincushions. So simple and adorable. great way to reuse all those plastic bottle caps.

Wednesday, May 30, 2012

Unpaper Towels

Everyone knows I love my cloth diapers.  We use cloth wipes, cloth napkins and cloth cleaning wipes. But what the hell is an unpaper towel?
We go through more paper towels than I'd like to admit and I wanted to find a better option. I found a simple tutorial and got working.
I chose to go with a darker terry so stains wouldn't show up easily. I also managed to get flannel on clearance at Joann's for $1.50 a yard. I also used my serger to sew them together instead of stitching, turning and top stitching.
Having them snapped on the roll is really convenient since I have limited counter space.
Now I just see the commercials for paper towels and laugh.  Even Ben thinks they are great and loves using them.  He can wipe down the counter and then leave the towel for wiping up again later.

I'm trying to get enough "growl towels" to make myself a dozen Memphis Grizzlies towels.


Don't forget to enter the Name My Serger Contest/Giveaway


Wednesday, May 16, 2012

Name my serger contest/giveaway

My new serger is in, but it doesn't have a name.  You know me, it needs a name.
I had been planning to do some sort of giveaway when I reached 100 followers. Since I reached that milestone while we were in the middle of moving it got pushed back.


So I'm having a contest. Name my serger! 
Name me!!!
This is a Singer Stylist Serger.  I'm open to the strange and unusual names. In case you were wondering here are the names of my other 2 machines:
I have a Singer Stylist Sewing machine named Zoe (Zoh).  Because the first stylist to come to mind was Rachel Zoe.
My sewing/embroidery machine is a Brother machine from the Project Runway line. He's names Mondo, because Mondo was cheated out of a win.

The rules for this contests are really simple:
1: You can enter as many times as you want.  You can have multiple entries in 1 comment.  I'm choosing the winner by the name I like best so feel free to comment with any names you think of.
2: You need to be following me. Twitter, Facebook, Blogger, Network Blogs, etc...just let me know how you are following me when you comment.
3: If you don't have an email attached to your name when you comment please include one so I can contact you if you are the winner.


The winner gets to choose their hand made prize (within reason).
Want a lunch bag?
How about a tablet cover?
Even homemade baby legs. 

This contest will be open until Thursday June 7th (which also happens to be my birthday).

Monday, May 14, 2012

Let's give 'em something to chalk about

I've always wanted to do a chalk wall.  Just one problem...we're in an apartment right now.  While I could paint the wall and then paint it back before we move I figure that is just too much work if it isn't going to be permanent.
I leave myself a ton of notes and love the dry erase board we have in the kitchen. But I needed something in my craft room for projects.  I told Ben I wanted to go to Tuesday Morning to look around. If you haven't been to a Tuesday Morning you should check it out. (No, I am not getting any compensation from them, I think it's a great store with some amazing deals)

I came across stick up chalk boards.
Great price
I couldn't decide between the cup and saucer or the teapot. So I got both.
It fits perfectly on the wall
Now I can write my projects on the chalk boards instead of on papers I keep throwing out.  And I promised that shelf is on straight.  I was just at a strange angle getting the shot.

Friday, May 4, 2012

I'm bouncing around the apartment and squealing.  I've been lusting after a serger for some time now. It would be great to have with all the clothing I'm making for myself and others.
I know Ben had been setting money aside to get me one, but my mother is visiting and decided to cover the rest of the cost. 

It should be here in a week and I was so excited I started crying.  Now to buy some thread cones.

Thursday, April 26, 2012

Lovely lunch bag

oh how I love instagram!
Today Garrett started at Transformations. I'm excited about him getting extra therapy and I think it's a great transition to him starting school this fall. He'll be going twice a week for 4 hours each time, which means he'll be eating lunch there. I loved packing him a lunch today but hated using a brown paper bag.

You know me...that didn't last long. Once I knew he would be going I ordered some Insul-Fleece because I had found a simple lunch bag tutorial. However I hate buying laminated cotton.  It's really expensive and you can just make your own with iron on vinyl.
Now before anyone says anything about food safe I did check on this. It is food safe, they just recommend not using it for anything your child will chew on. 

So I laminated a couple pieces of fabric I got on clearance at Walmart. I really love making my own laminated cotton because I can choose any pattern I want without paying $20 a yard.


I have a snap press but you can always use velcro.  For the next bag I'll make sure I change out my thread and use something matching.  It's bigger than a plastic bag and I know it will keep things cool while we go from home to his classes (it gets hot here in the Mid-South).

And yes, I know the ships are upside down, they are right side up on the other side. The fabric was too cute to pass up and I did this one quickly so I had it for Friday.

Monday, April 2, 2012

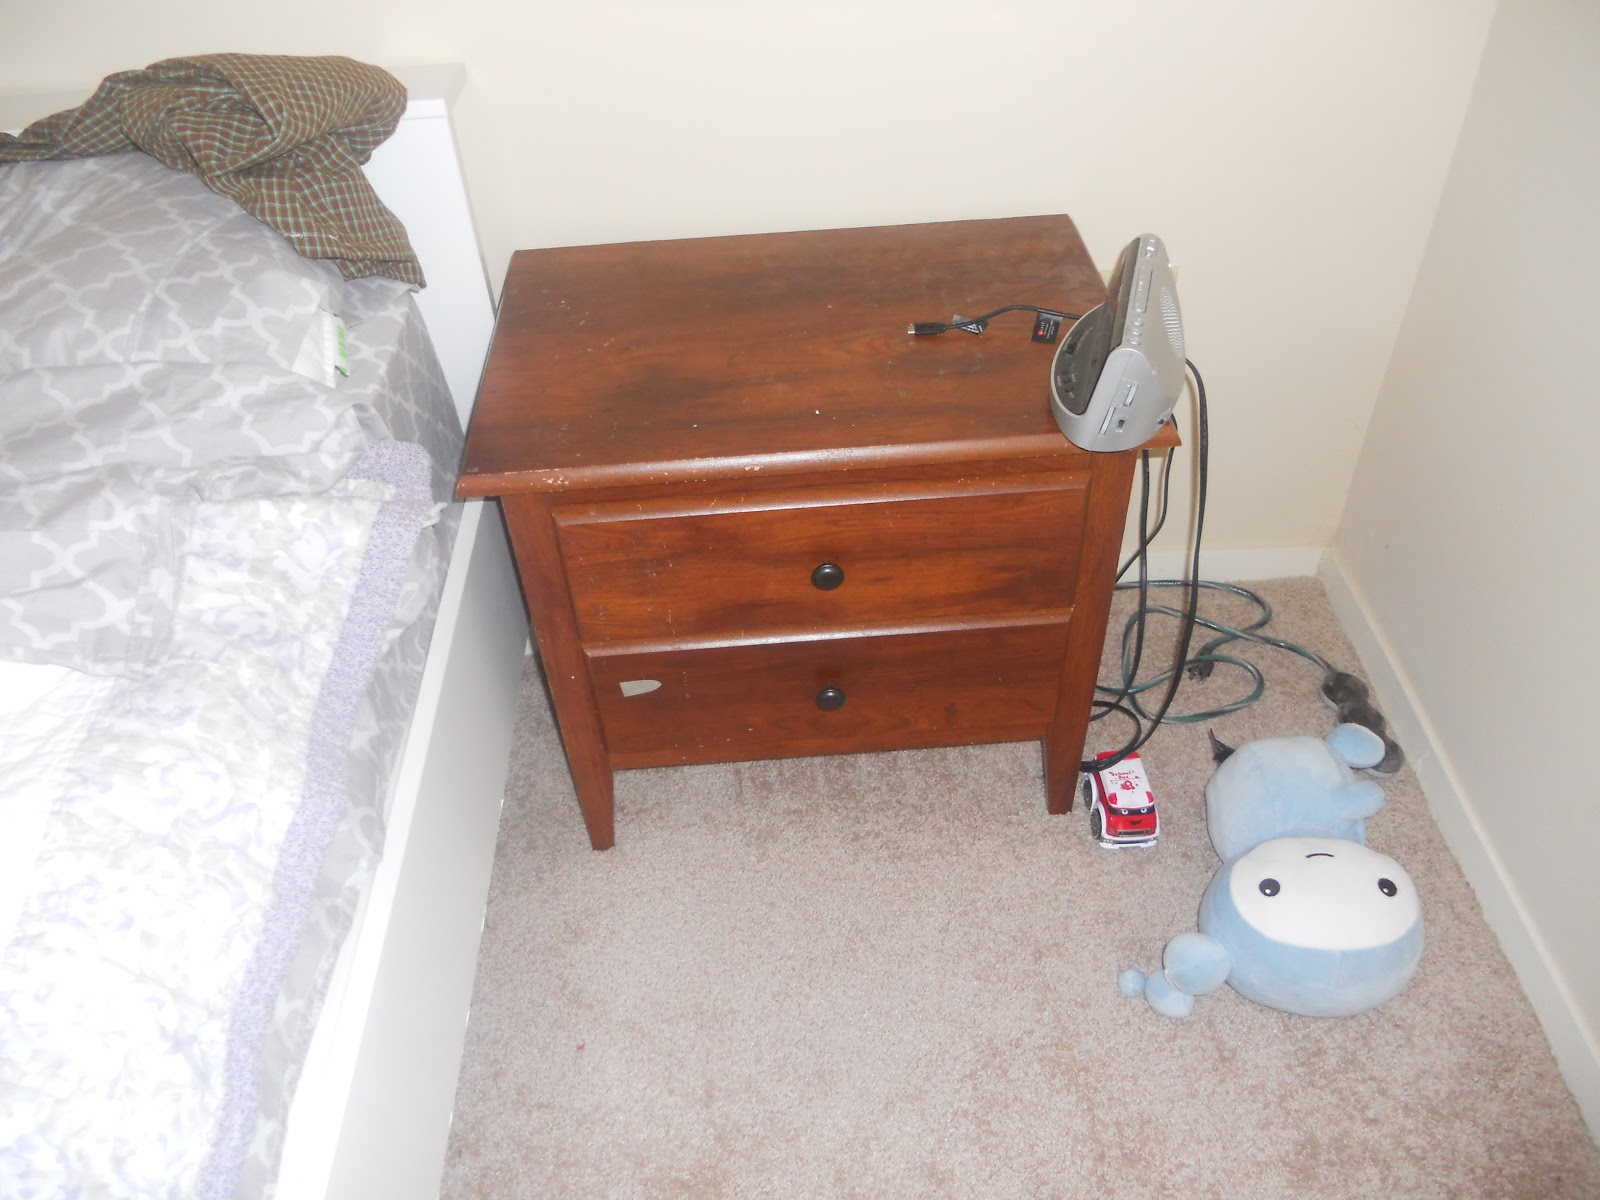
Nightstand face lift

We don't have much bedroom furniture but we do have matching nightstands we got at Target several years ago.  They've served us well but I hate the dark color in the bedroom right now.

I found some remnant home decor fabric last year that was really cute. I had no idea what to do with it though.  A few months later I found the same fabric in another color...now I have it in pink and in blue.  I decided to do a his and hers nightstand makeover.

I've been planning to fix them up for a while and thought the blue and pink would be a fun touch.
This project doesn't require much and is great for a beginner.

Supplies:
Furniture to be painted
Paint (I love using a spray for this)
Fabric (I prefer home decor weight)
Adhesive (Mod Podge, spray adhesive, glue, whatever you prefer)
Q-tips (only if you are painting the drawers)
Sand paper
X-acto knife

There was certainly a bit of water damage on these

Take the drawers out, knobs off and sand paper any rough spots or edges. Any bumps are going to show when it is painted.

If you are painting the drawers:
Stick Q-tips in the knob holes and the ends of the knobs (if you are painting them). This will prevent paint from closing the holes up.  Since my fabric has some white and I didn't want the dark wood to show through I painted the drawer front. 
We did a couple coats to completely cover the dark wood

Spray paint your pieces.  I also spray painted the knobs so we didn't have to buy new ones.
Let the paint dry.

You can add the fabric to the drawers while the paint is still a little tacky.  Cut the fabric a little larger than the drawers. Apply your adhesive, I chose to apply it to my drawer and then put the fabric on.  You can cut off the extra fabric or fold it around the edges.  I chose to cut the fabric off and make sure it had plenty of adhesive so it wouldn't peel away.

Once everything is dry, poke through the knob hole and make a small hole in the fabric.
Put the knobs back on and the drawers back in.

It's an easy weekend project that adds some personality to your furniture.
I love our his and hers nightstands. They really brighten up the room.

Saturday, March 10, 2012

No Sew Book Cover for a Tablet Computer

I'm excited about finally being able to get a tablet computer. I'm even more excited about making some awesome covers for my new tablet.
I've seen a ton of cool book covers, some required me to put Velcro on the back of my tablet. Others wanted me to use something called "sugru".  So I made one for myself.


You can use this tutorial for any size tablet or eReader.
My tablet measures 10.1" x 6.9" x 0.34"
I wanted to get a book that would fit so I looked for something approximately 11" x 7.5" x 1". 

I'm rather particular about which book I was using even though I was covering it with fabric. This book was so appropriate, not only was it a Southern cookbook but it was my for my birth year.  $2.99 at Goodwill, can't beat that.

These are the supplies you'll need:
Book to fit your tablet or eReader
Fabric (1/2 yard should be more than enough)
Chipboard (if you have an old binder you can cut this out of the front and back.  Otherwise look for "MatteBoard" in an art store)
Elastic
Crafting Glue (such as E600)
Batting (optional)
Xacto/Box cutter


Start by cutting the pages out of the book. You can use those for wrapping paper or other projects. I saved mine since it had some good recipes.

Open up the book and measure the fabric around the outside. Measure and cut an inch larger all the way around.  Fold the extra inch of fabric to the inside of the book and glue it down.  Give special care to your corners.

Measure a piece of fabric about and inch longer spine of the book and twice as wide. Center this on the inside of the spine and glue down.  Take the top and bottom ends, fold them over and glue them under.   You should have some overlap on either side of the spine.


Now take your chip board and cut 2 pieces the size of the front and back cover. Cut 2 pieces of batting the same size at the chip board. Then cut 2 pieces of fabric an inch larger around than the chip board.

Cut 4 equal pieces of elastic.  Length depends on size of your tablet/eReader. 
You are only attaching elastic to 1 of the inner pieces, this will be used on the inside back (right hand side) of the book.

Start with 1 set of inner cover pieces. Lay the fabric face down. Center the batting and then the chipboard on top of it. fold the edge around the same way you did with the outside of the book and glue them down.  The edges of the elastic will come around to the back of the chip board.

After I had the fabric on I added the elastic to the corners. Make it go around the corners.  I secured it to the chip board with staples. 
I ended up having to redo the elastic and have it higher up to hold my tablet

Repeat for the other inner cover but don't add elastic.  You can add a shorter layer of fabric first to give yourself a pocket. (I sewed the 2 pieces of fabric together to make them a bit more secure but you don't have to).

Glue the inner pieces to the inside of the book.  If you have wax paper put it down and put a heavy book on it to help the glue adhere securely.

You're done. Check out how cool your tablet/eReader looks in it's new cover.


You can barely tell there is a pocket on the left side.


Monday, February 27, 2012

Ruffle shirt

I've been eying this awesome shirt for a while. I had some cute fabric in my stash so what was I waiting for? I was told that the summer here was going to be hell.
That was enough to get me to start making more clothing for myself.  I love that I can use light weight cotton for this shirt.

New shirt and a new haircut

I had 2 sets of fabric I was going to use to make 2 separate shirts. I decided to start with the one I liked less just in case I screwed it up the first go around.  I did try out the shoulder ruffles but moved the pockets from the sides to the front.
The pattern is simple and straight forward and I promise the math at the beginning isn't that hard if you write it down as you measure.


Wednesday, February 22, 2012

Taxes, Tablets and Crafts

I'm so excited that when our tax refund comes in I'll finally be able to get the Samsung Galaxy Tab 10.1 that I've been saving up for.
I was able to use the Amazon.com gift cards I had to buy some accessories for it.  I was going to buy a cover and then I remembered how many crafted covers I've seen.

I'll be crafting 2 covers for my new tablet computer. I'm waiting for the fabric to come in.  I will be posting a tutorial for a no sew tablet book cover.

I've also been getting sewing work on a regular basis.  Feel free to check out my flickr stream to see what new things I'm adding. 


Thursday, February 16, 2012

Nightgown

I've been meaning to make myself a new nightgown.  I have one made of cotton that I got for $6 on clearance at the GAP.
I came across a simple nightgown pattern the other day. I didn't have enough of one fabric for the pattern so I used 2 fabrics with the same color scheme. 
It's nice and loose which will be really comfy in the summer months.  This pattern would also make a cute top if you shortened it. 
Kid tested

Not only is the pattern easy but even with my doing fabric strips I finished it in an afternoon (with interruptions). 

Doxie approved

Monday, February 13, 2012

Don't throw away those ripped pants

For some reason Ben wears through his clothes faster than our toddler. One of his pairs of khakis got a rip in the knee.
"They're not ripped, they're worn through."
"What exactly are you doing at work that you are wearing through the knees on your pants?"
*crickets*

He was going throw them out when it occurred to me that Ben doesn't have any shorts. I know he can't wear them to work but he'll want them for weekends since it will get pretty damned warm here in Memphis.

After a quick modification the pants are now shorts. I cut off the excess fabric and hemmed them.  Instead of tossing the excess fabric away I saved it for the next time he rips any of his khaki pants.
It only took a few minutes for me to do and it saved us from spending a lot more money.
Ben says he looks like he's going golfing
Please consider donating just a few dollars to help fund the FORCE Memphis Chapter.

Wednesday, February 1, 2012

Don't throw away that plastic bottle

I love reusing things. I love Mod Podge. So when I found a tutorial that allowed me to put those 2 things together I was excited. 
Turn your lotion bottle in to a cell phone holder.  What a nifty idea.
I had to make one for visiting guests who always charge their cell phones in our kitchen plugs.  None of my lotion or baby wash bottles were empty so I used a baby powder bottle.

It worked well and provided me with space for my camera and charger. It makes those plugs on the kitchen counter so much more useful. Now I can use the plug in the corner and still reach my camera. As an added bonus I don't have to worry if the counter gets wet because my electronics are charger in their holder.
Fits perfectly above my vitamins

These would make great gifts and are easy to personalize. I used glow in the dark Mod Podge on mine for something extra fun.
How fun is that?

Tuesday, January 24, 2012

Scrappy

I love projects that get me using scraps. I found this project a while back.  My first attempt was a massive failure and the project disintegrated in my hands.

After having some nifty fabric bits left over from making a top I decided to try it again.  I made a few changes.
1: Instead of wetting the entire "stabilizer sandwich" I used a spray bottle with warm water.  I placed my circle over a bowl and sprayed and shaped it. It gave me much more control and I didn't have to worry about it falling apart.
2: I used extra stabilizer pieces and added them as I wet the bowl. I even added some extra fabric and thread to cover up any bare spots I saw.

It ended up taking more than overnight to dry but it didn't fall apart this time.
 Looks like a cute little bird's nest. Now to figure out what to use it for.