Showing posts with label tutorial. Show all posts

Monday, April 2, 2012

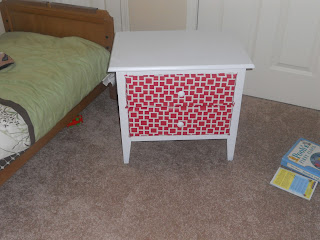
Nightstand face lift

We don't have much bedroom furniture but we do have matching nightstands we got at Target several years ago.  They've served us well but I hate the dark color in the bedroom right now.

I found some remnant home decor fabric last year that was really cute. I had no idea what to do with it though.  A few months later I found the same fabric in another color...now I have it in pink and in blue.  I decided to do a his and hers nightstand makeover.

I've been planning to fix them up for a while and thought the blue and pink would be a fun touch.
This project doesn't require much and is great for a beginner.

Supplies:
Furniture to be painted
Paint (I love using a spray for this)
Fabric (I prefer home decor weight)
Adhesive (Mod Podge, spray adhesive, glue, whatever you prefer)
Q-tips (only if you are painting the drawers)
Sand paper
X-acto knife

There was certainly a bit of water damage on these

Take the drawers out, knobs off and sand paper any rough spots or edges. Any bumps are going to show when it is painted.

If you are painting the drawers:
Stick Q-tips in the knob holes and the ends of the knobs (if you are painting them). This will prevent paint from closing the holes up.  Since my fabric has some white and I didn't want the dark wood to show through I painted the drawer front. 
We did a couple coats to completely cover the dark wood

Spray paint your pieces.  I also spray painted the knobs so we didn't have to buy new ones.
Let the paint dry.

You can add the fabric to the drawers while the paint is still a little tacky.  Cut the fabric a little larger than the drawers. Apply your adhesive, I chose to apply it to my drawer and then put the fabric on.  You can cut off the extra fabric or fold it around the edges.  I chose to cut the fabric off and make sure it had plenty of adhesive so it wouldn't peel away.

Once everything is dry, poke through the knob hole and make a small hole in the fabric.
Put the knobs back on and the drawers back in.

It's an easy weekend project that adds some personality to your furniture.
I love our his and hers nightstands. They really brighten up the room.

Saturday, March 10, 2012

No Sew Book Cover for a Tablet Computer

I'm excited about finally being able to get a tablet computer. I'm even more excited about making some awesome covers for my new tablet.
I've seen a ton of cool book covers, some required me to put Velcro on the back of my tablet. Others wanted me to use something called "sugru".  So I made one for myself.


You can use this tutorial for any size tablet or eReader.
My tablet measures 10.1" x 6.9" x 0.34"
I wanted to get a book that would fit so I looked for something approximately 11" x 7.5" x 1". 

I'm rather particular about which book I was using even though I was covering it with fabric. This book was so appropriate, not only was it a Southern cookbook but it was my for my birth year.  $2.99 at Goodwill, can't beat that.

These are the supplies you'll need:
Book to fit your tablet or eReader
Fabric (1/2 yard should be more than enough)
Chipboard (if you have an old binder you can cut this out of the front and back.  Otherwise look for "MatteBoard" in an art store)
Elastic
Crafting Glue (such as E600)
Batting (optional)
Xacto/Box cutter


Start by cutting the pages out of the book. You can use those for wrapping paper or other projects. I saved mine since it had some good recipes.

Open up the book and measure the fabric around the outside. Measure and cut an inch larger all the way around.  Fold the extra inch of fabric to the inside of the book and glue it down.  Give special care to your corners.

Measure a piece of fabric about and inch longer spine of the book and twice as wide. Center this on the inside of the spine and glue down.  Take the top and bottom ends, fold them over and glue them under.   You should have some overlap on either side of the spine.


Now take your chip board and cut 2 pieces the size of the front and back cover. Cut 2 pieces of batting the same size at the chip board. Then cut 2 pieces of fabric an inch larger around than the chip board.

Cut 4 equal pieces of elastic.  Length depends on size of your tablet/eReader. 
You are only attaching elastic to 1 of the inner pieces, this will be used on the inside back (right hand side) of the book.

Start with 1 set of inner cover pieces. Lay the fabric face down. Center the batting and then the chipboard on top of it. fold the edge around the same way you did with the outside of the book and glue them down.  The edges of the elastic will come around to the back of the chip board.

After I had the fabric on I added the elastic to the corners. Make it go around the corners.  I secured it to the chip board with staples. 
I ended up having to redo the elastic and have it higher up to hold my tablet

Repeat for the other inner cover but don't add elastic.  You can add a shorter layer of fabric first to give yourself a pocket. (I sewed the 2 pieces of fabric together to make them a bit more secure but you don't have to).

Glue the inner pieces to the inside of the book.  If you have wax paper put it down and put a heavy book on it to help the glue adhere securely.

You're done. Check out how cool your tablet/eReader looks in it's new cover.


You can barely tell there is a pocket on the left side.


Tuesday, September 20, 2011

What every sewing room needs

A pressing table!
Space is limited in my sewing area. I don't even have a full sized ironing board. When I want to iron I take my mini board and put it on the dining room table, while the condo isn't huge it was still a pain in the butt to drag my sewing out to the table and plug in the iron.


I found a a website where a woman had used a TV tray to make a pressing table.  I needed this for my sewing room.  I found a TV tray at Target for under $10, the fabric and batting I already had.  It took less than 30 minutes and I had my own collapsing pressing table. 
My own pressing table right by my sewing table

I love it, it fits perfectly by my sewing table when I need it and folds up when I don't. I'm thinking of maybe getting a pain pen and adding some designs to the legs just to make it a little more funky and personalized. Even without the extra touch it's perfect for my space.

it's a small space but it's mine
Of course I wrote this before I knew I was moving to Memphis. I'm looking forwards to having a larger craft space and many new projects

Wednesday, August 10, 2011

Super simple fabric business card case

Try saying that 5 times fast. Go ahead, I'll wait.
I love projects that use up my scraps and remnants I have left over from other projects. It took less than 10 minutes.

What you'll need:
Fabric.  My piece was 10 1/2 inches  x 5 inches and fits standard business cards.
An iron (optional but it makes it easier)
Thread, coordinating or contrasting depending on the look you are going for.
Velcro or snaps (optional)
If your fabric isn't already the right size start by cutting a piece 10 1/2 inches wide by 5 inches high. 
I did my best to center the pattern

Next I ironed creases in to my fabric.  You don't have to do this part but it made it easier.
Short sides
fold the short sides in 1/8 inch and press.  Then fold an additional 2 inches in and press.
Folded in again

On the long side you'll fold the fabric 1/8 inch and press.

Long sides

Now you're up to the sewing part.  Unfold the short sides leaving the 1/8 inch piece still folded in and stitch.

Fold the short sides at the 2 inch crease. Making sure the long sides are still folded down, sew along the long edges. This will secure both of the pockets.
Make sure to keep everything folded in


All done! Yes, it's that simple.
My cards fit in here nicely
It has plenty of space for my cards as well as the cards I get from other people. 
If you want to add some extra flair you can do some applique, embroidery or a decorative stitch around the edges.
You can always add some Velcro or snaps to keep it closed but I loved the way it felt without a bulky snap. It fits in my bag or slides neatly in to my pocket without looking bumpy. Since it's cute you always want to give out business cards just to show off the case.


Friday, July 22, 2011

Mini things are always cute

I'm in love with the look of these floor cushions.  I really want to make one for the house but there just isn't room right now.  And then I thought "wouldn't those be adorable if they were tiny?" and then "What the hell would I do with a tiny one because we don't have a doll house."

PINCUSHIONS!  They would make the most adorable pin cushions. They'd stand on their own and be large enough so needles wouldn't go through the other side. For an added bonus I purchased some loose emery powder to use to help keep my needles sharp. Emery powder is what is in the little strawberry that dangles from the tomato pincushion. 


What you'll need:
Fabric.  Any weight will work.  This project is great for scraps.
Thread
Piping.  Around 18" should do the trick. This is a great use for all those smaller piping pieces.
Loose Emery powder or Polyfil
Muslin (if you are using Emery)


I used the exact same pattern for the floor cushions but just scaled down.  Choose a glass that is a little larger (seams will end up being around 1/2" because of the piping) than the size you want your pincushion.

For the rectangular piece measure the circumference of your circle and cut a rectangle that is an inch longer.  The width of the rectangle depends on how high you want your cushion.  My pins are medium length so I went with 2 1/2" wide.


If you are using Emery Powder cut another 2 circles and rectangle out of your Muslin.  You'll sew those together and put the Emery inside the Muslin. This will prevent the powder from coming out when you put your pins in your pincushion.

Stitch as per the floor cushion instructions.
Leave half the circle open so you can get your Muslin bag in before you hand stitch it shut.  I pretty much hand sewed the entire thing because it's so tiny.
 It's fun and I love the way it looks on my sewing table.  Especially with the bonus of it helping sharpen my needles.

Tuesday, June 21, 2011

Why buy when you can make it?

One of the other moms at Early Intervention showed me a blanket she had purchased for her daughter.  They run $25 and her daughter loves her blanket, I had some left over minky fabric from another blanket so I decided to make one. 
Forgive the quick cell phone picture

What you'll need:
patterned fabric
softer plush fabric (I used minky)
contrasting thread
a piece of ribbon (optional)

Figure out how large you want to make the blanket and how large you would like the tabs to be.  I made my blanket 16" x 16" and the tabs 1" wide x 5" long. Cut 1 set out of your patterned fabric and 1 set out of your soft fabric. I made 12 tabs, 3 for each side. I used a 1/8" seam allowance but you can do whatever you are comfortable with.  Just make sure you account for your seam allowance when you cut your fabric.
A ruler and rotary cutter make this part easier

This is the tedious part, sewing together those little tabs. Place a patterned strip and a soft strip right sides facing and sew 1 short side and 2 long sides together.

Now turn it right side out.
Ben helped turn them while I sewed

You can leave the top seam unfinished because that will be hidden in the finished blanket.  I started tying all my knots in the tabs.  You can do it later but if your tabs are shorter it may be rough.

Pin the tabs to the blanket the the unfinished ends together.
I did 3 on each side.

I wanted my minky side to be showing on the tabs when it shows on the back so I pinned them with patterned sides together. Just remember, the side you pin face down against your pattern will be the side that shows when the blanket is facing up.
The left one shows how I sewed, the right is how it will lay when finished

Sew the tabs in place with a 1/8" seam allowance. You only need to go over them once because we'll be securing them more later.
I added a piece of ribbon in a loop to one corner just like the original blanket.  You don't have to do it, but it makes it easier to clip it on to something.
a fun contrasting color, left over ribbon is easy to find

Now place the minky on top of your patterned fabric right sides together.  Make sure all of the tabs are laying flat against the patterned fabric.
make sure the tabs are inside like this

Now sew with a 1/4" seam allowance so you get the ends of all those tabs again.  Leave 1 1/2" open for turning.

Turn your blanket right side out. Instead of doing a plain topstich I used the zig zag stitch.  You could always use a more decorative stitch because it will show with a contrasting thread.

All done, much cheaper than buying it and much more personal to give as a gift.
Lila approves of her new blanket.

Wednesday, June 15, 2011

I'm guest blogging today

Check out my guest blog over at Tales of an Unlikely Mother where I talk about making grommeted headbands.  You can even make them without sewing.

Saturday, June 4, 2011

Headband tutorial revisited

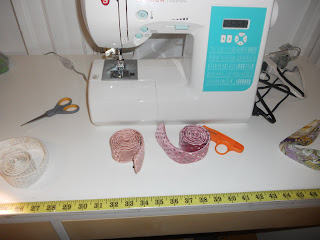
Last year I made myself some cute headbands.  I realized that I had some silk ties I used as headbands but I hated the big bump they made when I knotted them in the back.  Wait, I have a sewing machine, so I figured I could adjust my own tutorial to make these silk ties more wearable. 
ties after being cut
Ties after the ends were snipped

The biggest problem I had was that layer of foam in the tie to make it thicker.  I found I could keep the shape of the tie but still sew an elastic in if I snipped some of the foam off the ends.
edges folded under
folding under the edges

The I folded in the unfinished edges and sewed the elastic in with a zig zag stitch.
zig zag stitch
A simple zig zag stitch
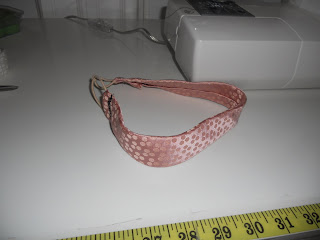
 In a few minutes I had a handful of better fitting headbands.  Just in time for the hot weather.

finished headband
yay headband